Axios的理解与使用

axios 是什么?

axios 特点

  • 基于 xhr + promise 的异步 ajax 请求库
  • 浏览器端/node端都可以使用
  • 支持请求/响应拦截器
  • 支持请求取消
  • 请求/响应数据转换
  • 批量发送多个请求

axios 常用语法

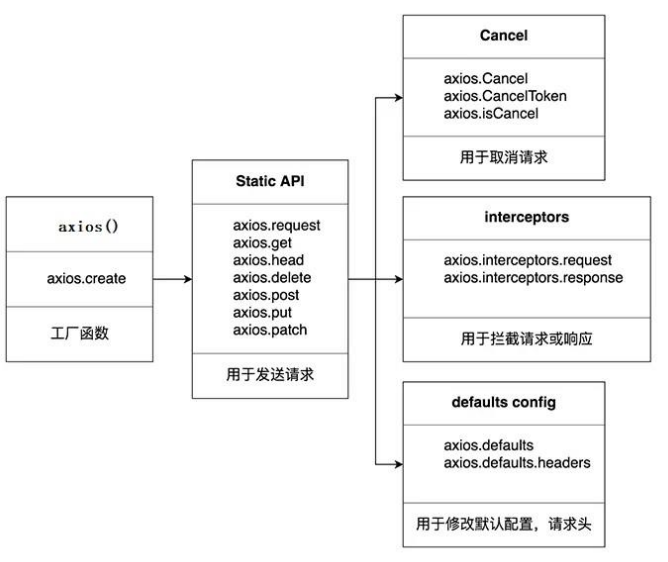
  • axios(config): 通用/最本质的发任意类型请求的方式
  • axios(url[, config]): 可以只指定 url 发 get 请求
  • axios.request(config): 等同于 axios(config)
  • axios.get(url[, config]): 发 get 请求
  • axios.delete(url[, config]): 发 delete 请求
  • axios.post(url[, data, config]): 发 post 请求
  • axios.put(url[, data, config]): 发 put 请求
  • axios.defaults.xxx: 请求的默认全局配置
  • axios.interceptors.request.use(): 添加请求拦截器
  • axios.interceptors.response.use(): 添加响应拦截器
  • axios.create([config]): 创建一个新的 axios(它没有下面的功能)
  • axios.Cancel(): 用于创建取消请求的错误对象
  • axios.CancelToken(): 用于创建取消请求的 token 对象
  • axios.isCancel(): 是否是一个取消请求的错误
  • axios.all(promises): 用于批量执行多个异步请求
  • axios.spread(): 用来指定接收所有成功数据的回调函数的方法

原理图

j2GiCQ.png

难点语法的理解和使用

axios.create(config)

  1. 根据指定配置创建一个新的 axios, 也就是每个新 axios 都有自己的配置

  2. 新 axios 只是没有取消请求和批量发请求的方法, 其它所有语法都是一致的

  3. 为什么要设计这个语法?

    • 需求: 项目中有部分接口需要的配置与另一部分接口需要的配置不太一样, 如何处理
    • 解决: 创建 2 个新 axios, 每个都有自己特有的配置, 分别应用到不同要求的接口请求中
1
2
3
4
5
6
7
8
9
10
11
12
13
14
15
16
17
18
//创建实例对象  /getJoke
const duanzi = axios.create({
baseURL: 'https://api.apiopen.top',
timeout: 2000
});
const onather = axios.create({
baseURL: 'https://b.com',
timeout: 2000
});
//这里 duanzi 与 axios 对象的功能几近是一样的
// duanzi({
// url: '/getJoke',
// }).then(response => {
// console.log(response);
// });
duanzi.get('/getJoke').then(response => {
console.log(response.data)
})

拦截器函数/ajax 请求/请求的回调函数的调用顺序

  1. 说明: 调用 axios()并不是立即发送 ajax 请求, 而是需要经历一个较长的流程
  2. 流程: 请求拦截器2 => 请求拦截器1 => 发ajax请求 => 响应拦截器1 => 响应拦截器 2 => 请求的回调
  3. 注意: 此流程是通过 promise 串连起来的, 请求拦截器传递的是 config, 响应 拦截器传递的是 response
1
2
3
4
5
6
7
8
9
10
11
12
13
14
15
16
17
18
19
20
21
22
23
24
25
26
27
28
29
30
31
32
33
34
35
36
37
38
39
40
41
42
43
44
45
46
47
48
49
50
// Promise
// 设置请求拦截器 config 配置对象
axios.interceptors.request.use(function (config) {
console.log('请求拦截器 成功 - 1号');
//修改 config 中的参数
config.params = {
a: 100
};
return config;
}, function (error) {
console.log('请求拦截器 失败 - 1号');
return Promise.reject(error);
});

axios.interceptors.request.use(function (config) {
console.log('请求拦截器 成功 - 2号');
//修改 config 中的参数
config.timeout = 2000;
return config;
}, function (error) {
console.log('请求拦截器 失败 - 2号');
return Promise.reject(error);
});

// 设置响应拦截器
axios.interceptors.response.use(function (response) {
console.log('响应拦截器 成功 1号');
return response.data;
// return response;
}, function (error) {
console.log('响应拦截器 失败 1号')
return Promise.reject(error);
});

axios.interceptors.response.use(function (response) {
console.log('响应拦截器 成功 2号')
return response;
}, function (error) {
console.log('响应拦截器 失败 2号')
return Promise.reject(error);
});

//发送请求
axios({
method: 'GET',
url: 'http://localhost:3000/posts'
}).then(response => {
console.log('自定义回调处理成功的结果');
console.log(response);
});

取消请求

基本流程 :

  1. 配置 cancelToken 对象
  2. 缓存用于取消请求的 cancel 函数
  3. 在后面特定时机调用 cancel 函数取消请求
  4. 在错误回调中判断如果 error 是 cancel, 做相应处理

实现功能 点击按钮, 取消某个正在请求中的请求,

1
2
3
4
5
6
7
8
9
10
11
12
13
14
15
16
17
18
19
20
21
22
23
24
25
26
27
28
29
//获取按钮
const btns = document.querySelectorAll('button');
//2.声明全局变量
let cancel = null;
//发送请求
btns[0].onclick = function () {
//检测上一次的请求是否已经完成
if (cancel !== null) {
//取消上一次的请求
cancel();
}
axios({
method: 'GET',
url: 'http://localhost:3000/posts',
//1. 添加配置对象的属性
cancelToken: new axios.CancelToken(function (c) {
//3. 将 c 的值赋值给 cancel
cancel = c;
})
}).then(response => {
console.log(response);
//将 cancel 的值初始化
cancel = null;
})
}

//绑定第二个事件取消请求
btns[1].onclick = function () {cancel(); }

默认配置

1
2
3
4
5
6
7
8
9
10
11
12
13
//默认配置
axios.defaults.method = 'GET';//设置默认的请求类型为 GET
axios.defaults.baseURL = 'http://localhost:3000';//设置基础 URL
axios.defaults.params = {id:100};
axios.defaults.timeout = 3000;//

btns[0].onclick = function(){
axios({
url: '/posts'
}).then(response => {
console.log(response);
})
}

Axios的难点问题

axios 与 Axios 的关系

  1. 语法上来说: axios 不是 Axios 的实例
  2. 功能上来说: axios 是 Axios 的实例
  3. axios 是 Axios.prototype.request 函数 bind()返回的函数
  4. axios 作为对象有 Axios 原型对象上的所有方法, 有 Axios 对象上所有属性

instance 与 axios 的区别?

  1. 相同:
    (1) 都是一个能发任意请求的函数: request(config)
    (2) 都有发特定请求的各种方法: get()/post()/put()/delete()
    (3) 都有默认配置和拦截器的属性: defaults/interceptors
  2. 不同:
    (1) 默认配置很可能不一样
    (2) instance 没有 axios 后面添加的一些方法: create()/CancelToken()/all()

axios运行的整体流程

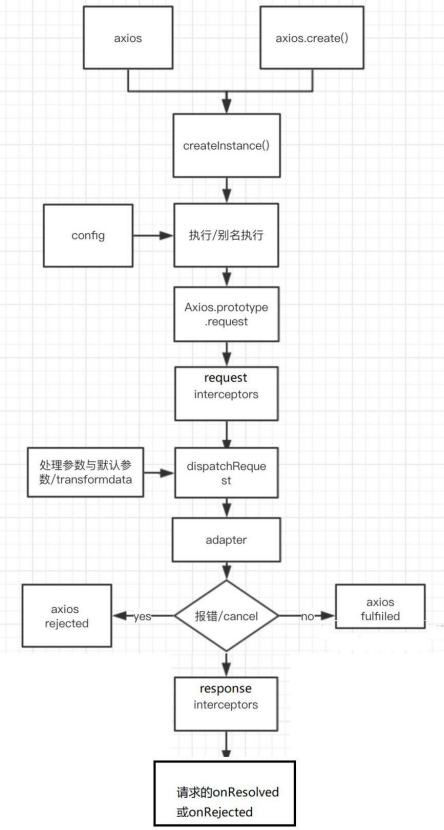
  1. 整体流程:
    request(config) ==> dispatchRequest(config) ==> xhrAdapter(config)

  2. request(config):
    将请求拦截器 / dispatchRequest() / 响应拦截器 通过 promise 链串连起来,
    返回 promise

  3. dispatchRequest(config):
    转换请求数据 ===> 调用 xhrAdapter()发请求 ===> 请求返回后转换响应数
    据. 返回 promise

  4. xhrAdapter(config):
    创建 XHR 对象, 根据 config 进行相应设置, 发送特定请求, 并接收响应数据,
    返回 promise

  5. 流程图:

    j2JPZ6.png

axios 的请求/响应拦截器是什么?

  1. 请求拦截器:
    Ⅰ- 在真正发送请求前执行的回调函数
    Ⅱ- 可以对请求进行检查或配置进行特定处理
    Ⅲ- 成功的回调函数, 传递的默认是 config(也必须是)
    Ⅳ- 失败的回调函数, 传递的默认是 error
  2. 响应拦截器
    Ⅰ- 在请求得到响应后执行的回调函数
    Ⅱ- 可以对响应数据进行特定处理
    Ⅲ- 成功的回调函数, 传递的默认是 response
    Ⅳ- 失败的回调函数, 传递的默认是 error

axios 的请求/响应数据转换器是什么?

  1. 请求转换器: 对请求头和请求体数据进行特定处理的函数
1
2
3
4
if (utils.isObject(data)) {
setContentTypeIfUnset(headers, 'application/json;charset=utf-8');
return JSON.stringify(data);
}
  1. 响应转换器: 将响应体 json 字符串解析为 js 对象或数组的函数
1
response.data = JSON.parse(response.data)

response与error 的整体结构

  1. response的整体结构
1
2
3
{
data, status,statusText,headers,config,request
}
  1. error 的整体结构
1
2
3
{
message,response,request,
}

如何取消未完成的请求?

  1. 当配置了 cancelToken 对象时, 保存 cancel 函数
  2. 创建一个用于将来中断请求的 cancelPromise
  3. 并定义了一个用于取消请求的 cancel 函数
  4. 将 cancel 函数传递出来
  5. 调用 cancel()取消请求
  6. 执行 cacel 函数, 传入错误信息 message
  7. 内部会让 cancelPromise 变为成功, 且成功的值为一个 Cancel 对象
  8. 在 cancelPromise 的成功回调中中断请求, 并让发请求的 proimse 失败,
  9. 失败的 reason 为 Cancel 对象

完整过一遍axios

axios请求方法

主要有get,post,put,patch,delete

  • get

    获取数据

  • post

    提交数据(表单提交+文件上传)

  • put

    更新数据(将所有数据均推放到服务端)

  • patch

    更新数据(只将修改的数据推送到后端)

  • delete

    删除数据

get方法

写法

调用型

1
2
3
axios.get('/data.json').then((res)=>{
console.log(res)
})

axios()型

1
2
3
4
5
6
axios({
method:'get',
url:'/data.json'
}).then((res)=>{
console.log(res)
})

params

调用型

1
2
3
4
5
6
7
axios.get('/data.json',{
params:{
id:12
}
}).then((res)=>{
console.log(res)
})

axios()方法型

1
2
3
4
5
6
7
8
9
axios({
method:'get',
url:'/data.json',
params:{
id:12
}
}).then((res)=>{
console.log(res)
})

post方法

写法

调用型

1
axios.post('/post',{},config)

post方法有三个参数,分别是url、数据、config。config参数暂时不讨论。

一般上传的数据分两种

  • form-data 表单提交(图片上传、文件上传)
  • application/json
  • 以上两种数据,都可以在请求发起后,进入浏览器network查看请求头中的content-type进行查看

假设我们现在要上传一个数据:

1
let data = { id:12 }

那么我们可以直接将其传入:

1
2
3
axios.post('/post',data).then((res)=>{
console.log(res)
})

axios()方法型

1
2
3
4
5
axios({
method:'post',
url:'/post',
data:data
}).then(...)

两种数据的小细节

当我们上传的是一个一般的let data = { id:12 }数据时,Network的请求头里会显示为:application/json;charset=UTF-8

当我们上传的是:

1
2
3
4
5
let data = {id:12}
let formData = new FormData()
for(let key in data){
formData.append(key,data[key])
}

这里将data转格式了,格式变为formdata形式。

那么Network的请求头里会显示为:multipart/form-data; boundary=----WebKitFormBoundarywWFnSlPye1ZF8CSw

put方法和patch方法

形式与post方法大体相同,Network显示仅Request Method不同。

delete方法

写法

url删除法

1
2
3
4
5
6
7
8
//直接从url里面删除
axios.delete('/data.json',{
params:{
id:12
}
}).then((res)=>{
console.log(res)
})

从url删除,Network请求头最后面会显示为:Query String Parameters

请求体删除法

1
2
3
4
5
6
7
axios.delete('/data.json',{
data:{
id:12
}
}).then((res)=>{
console.log(res)
})

从请求体里删除,Network请求头最后面会显示为:Request Payload

两种方法的删除方式是不同的,具体使用需要和后端沟通。

并发请求

简介

同时进行多个请求,并统一处理返回值。

案例:假设有一个聊天工具,同时有你的聊天记录和个人信息。此时需要调用两个接口去请求数据。此时需要统一处理他们的返回值。

axios提供的方法:all、spread

axios.all方法接受一个数组作为参数,数组中的每个元素都是一个请求,返回一个promise对象,当数组中所有请求均已完成时,执行then方法。 在then方法中执行了 axios.spread 方法。该方法是接收一个函数作为参数,返回一个新的函数。接收的参数函数的参数是axios.all方法中每个请求返回的响应。

1
2
3
4
5
6
7
8
9
10
11
12
function getUserAccount() {
return axios.get('/user/12345');
}

function getUserPermissions() {
return axios.get('/user/12345/permissions');
}

axios.all([getUserAccount(), getUserPermissions()])
.then(axios.spread((acct, perms) => {
// 两个请求都完成后,acct是getUserAccount的返回值,同理,perms是 getUserPermissions的返回值
}));

axios实例简介

为什么要用实例?

当我们需要用到不同的后端域名,直接调用axios.get并不太方便。我们可以用创建实例的方式去调用,不同的域名用不同的实例一一对应。

表现形式

1
2
3
4
5
6
7
8
9
created() {
let instance = axios.create({
baseURL:'http://localhost:8080',//基本请求路径
timeout:1000,//超时设定
})
instance.get('/data.json').then(res=>{
console.log(res)
})
}

基本配置方法

1
2
3
4
5
6
7
8
9
baseURL:'http://localhost:8080',//请求的域名、基本地址
timeout:1000,//请求超时时长(ms)
url:'/data.json',//请求路径
method:'get,post,put,patch,delete',//请求方法
headers:{
token:''//代表当前登陆人的身份信息
},//设置请求头
params:{},//将请求参数拼接在url上,是一个对象
data:{}//将请求参数放在请求体里,是一个对象

其中,params和data表现形式为对象

使用场景通常是发起请求时,顺带传送参数:

1
2
3
4
5
6
//以get请求为例,get有两个配置,分别是相对路径和config
axios.get('/data.json',{
params:{
//参数
}
})

参数配置方法

1.全局配置

1
2
3
axios.defaults.基本配置方法(baseurl等)
如:
axios.defaults.timeout = 1000 //全局配置请求时长1s

2.实例配置

1
2
3
let instance = axios.create(
//基本配置方法
)

如果设置了全局的配置方法,而实例配置中没有设置相应的方法,则延用全局的方法,否则,以实例中的方法为主。

3.axios请求配置

视具体情况而定,如调用某个路径的文件巨大,我们可以单独对其请求时长进行设置:

1
2
3
instance.get('/data.json',{
timeout:5000
})

总结

优先级:请求配置 > 实例配置 > 全局配置

拦截器

在发起请求前做一些处理,再发起请求后再做一些处理。

分为请求拦截器和响应拦截器

请求拦截器

1
2
3
4
5
6
7
8
9
10
axios.interceptors.request.use(
config=>{
//在发送请求前做些什么
return config
},
err=>{
// 在请求错误的时候做些什么(此处错误,请求没有到后端)
return Promise.reject(err)//这里返回一个promise对象
}
)

响应拦截器

1
2
3
4
5
6
7
8
9
axios.interceptors.response.use(
res=>{
//请求成功对响应数据进行处理
return res
},err=>{
//响应错误做些什么(此处错误,到达后端后返回)
return Promise.reject(err)
}
)

两者都在响应错误后进行了promise对象的返回,具体的作用是什么呢?

1
axios.get().then().catch(err=>{})

这一段代码是我们平时发送get请求时的标准形态,then会执行请求成功后的操作,catch用来捕获错误。

我们前面拦截响应后,无论是请求还是响应的拦截器,他们的err返回的promise都会进入catch中。

取消拦截器(了解即可)

1
2
3
4
5
6
7
8
let inerceptors = axios.interceptors.request.use
(config=>{
config.header = {
auth:true
}
return config
})
axios.inerceptors.request.eject(interceptors) //用axios全局去调用interceptors,这样就取消拦截了。。。

举个栗子

通过拦截器控制登陆状态

1
2
3
4
5
6
7
8
9
// 登陆状态,有token
let request = axios.create({})
request.interceptors.request.use
(config => {
config.headers.token = ''
return config
})
// 非登陆状态,无token
let request2 = axios.create({})

有token的可以访问更多,get更多的数据,无token则不行。类似于评论需要登陆

错误处理

表现形式

1
2
3
4
5
6
7
8
9
10
11
12
13
14
15
16
17
18
19
20
21
22
//首先设置拦截器
axios.interceptors.request.use(
config =>{
return config
},err =>{
return Promise.reject(err)
}
)
axios.interceptors.response.use(
res =>{
return res
},err =>{
return Promise.reject(err)
}
)

//错误的获取
axios.get('/data.json').then(res=>{
console.log(res)
}).catch(err =>{
console.log(err) //所有错误处理都会进入此处
})

具体的实践过程中,我们需要创建一个统一的错误处理,将所有的错误类型都放在拦截其中,方便我们后面调用接口时使用。

栗子

1
2
3
4
5
6
7
8
9
10
11
12
13
14
15
16
17
18
19
20
21
22
23
24
25
26
//创建一个请求实例
let instance = axios.create({})
//为请求实例添加请求拦截器
instance.interceptors.request.use(
config =>{
return config
},err =>{
//请求错误 一般http状态码以4开头,常见:401超时,404 not found 多为前端浏览器错误
return Promise.reject(err)
}
)
instance.interceptors.response.use(
res=>{
return res
},err =>{
//响应错误,一般http状态码以5开头,500系统错误,502系统重启等,偏向于服务端返回的报错
return Promise.reject(err)
}
)

//使用
instance.get('data').then(res=>{
console.log(res)
}).catch(err =>{
console.log(err)
})